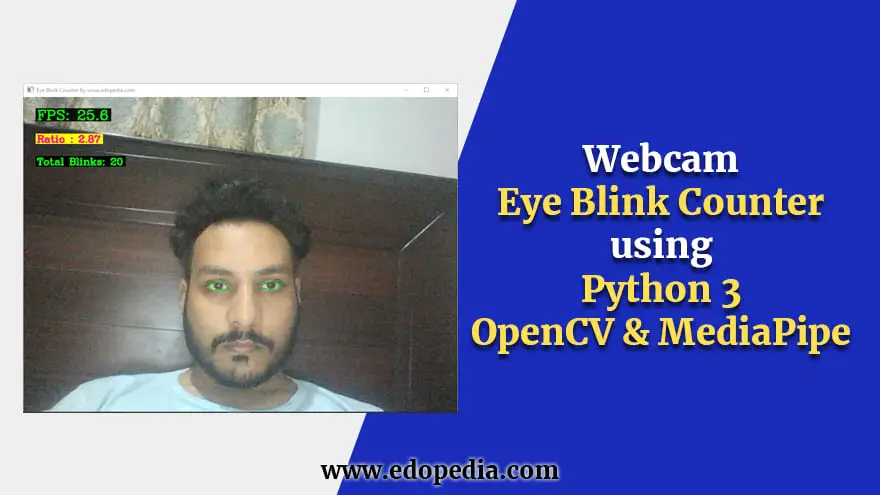
In this tutorial, you will get the full source code of the webcam Eye Blink Counter. Basically, we will use Python 3, OpenCV & MediaPipe to create this computer vision script. Our code will perform eye blink detection and then keep track of how many times the user blinks his eyes. This value is then printed inside a GUI Desktop App screen as “Total Blinks”.
pip install opencv-python --user
pip install mediapipe --user
import cv2 as cv
import mediapipe as mp
import time
import math
import numpy as np
# variables
frame_counter =0
CEF_COUNTER =0
TOTAL_BLINKS =0
# constants
CLOSED_EYES_FRAME =3
FONTS =cv.FONT_HERSHEY_COMPLEX

# face bounder indices
FACE_OVAL=[ 10, 338, 297, 332, 284, 251, 389, 356, 454, 323, 361, 288, 397, 365, 379, 378, 400, 377, 152, 148, 176, 149, 150, 136, 172, 58, 132, 93, 234, 127, 162, 21, 54, 103,67, 109]

# lips indices for Landmarks
LIPS=[ 61, 146, 91, 181, 84, 17, 314, 405, 321, 375,291, 308, 324, 318, 402, 317, 14, 87, 178, 88, 95,185, 40, 39, 37,0 ,267 ,269 ,270 ,409, 415, 310, 311, 312, 13, 82, 81, 42, 183, 78 ]
LOWER_LIPS =[61, 146, 91, 181, 84, 17, 314, 405, 321, 375, 291, 308, 324, 318, 402, 317, 14, 87, 178, 88, 95]
UPPER_LIPS=[ 185, 40, 39, 37,0 ,267 ,269 ,270 ,409, 415, 310, 311, 312, 13, 82, 81, 42, 183, 78]
# Left eyes indices
LEFT_EYE =[ 362, 382, 381, 380, 374, 373, 390, 249, 263, 466, 388, 387, 386, 385,384, 398 ]
LEFT_EYEBROW =[ 336, 296, 334, 293, 300, 276, 283, 282, 295, 285 ]

# right eyes indices
RIGHT_EYE=[ 33, 7, 163, 144, 145, 153, 154, 155, 133, 173, 157, 158, 159, 160, 161 , 246 ]
RIGHT_EYEBROW=[ 70, 63, 105, 66, 107, 55, 65, 52, 53, 46 ]

map_face_mesh = mp.solutions.face_mesh
# camera object
camera = cv.VideoCapture(0)

# colors
# values =(blue, green, red) opencv accepts BGR values not RGB
YELLOW =(0,255,255)
GREEN = (0,255,0)
PINK = (147,20,255)

def colorBackgroundText(img, text, font, fontScale, textPos, textThickness=1,textColor=(0,255,0), bgColor=(0,0,0), pad_x=3, pad_y=3):
    """
    Draws text with background, with  control transparency
    @param img:(mat) which you want to draw text
    @param text: (string) text you want draw
    @param font: fonts face, like FONT_HERSHEY_COMPLEX, FONT_HERSHEY_PLAIN etc.
    @param fontScale: (double) the size of text, how big it should be.
    @param textPos: tuple(x,y) position where you want to draw text
    @param textThickness:(int) fonts weight, how bold it should be
    @param textPos: tuple(x,y) position where you want to draw text
    @param textThickness:(int) fonts weight, how bold it should be.
    @param textColor: tuple(BGR), values -->0 to 255 each
    @param bgColor: tuple(BGR), values -->0 to 255 each
    @param pad_x: int(pixels)  padding of in x direction
    @param pad_y: int(pixels) 1 to 1.0 (), controls transparency of  text background
    @return: img(mat) with draw with background
    """
    (t_w, t_h), _= cv.getTextSize(text, font, fontScale, textThickness) # getting the text size
    x, y = textPos
    cv.rectangle(img, (x-pad_x, y+ pad_y), (x+t_w+pad_x, y-t_h-pad_y), bgColor,-1) # draw rectangle
    cv.putText(img,text, textPos,font, fontScale, textColor,textThickness ) # draw in text

    return img

def textWithBackground(img, text, font, fontScale, textPos, textThickness=1,textColor=(0,255,0), bgColor=(0,0,0), pad_x=3, pad_y=3, bgOpacity=0.5):
    """
    Draws text with background, with  control transparency
    @param img:(mat) which you want to draw text
    @param text: (string) text you want draw
    @param font: fonts face, like FONT_HERSHEY_COMPLEX, FONT_HERSHEY_PLAIN etc.
    @param fontScale: (double) the size of text, how big it should be.
    @param textPos: tuple(x,y) position where you want to draw text
    @param textThickness:(int) fonts weight, how bold it should be
    @param textPos: tuple(x,y) position where you want to draw text
    @param textThickness:(int) fonts weight, how bold it should be.
    @param textColor: tuple(BGR), values -->0 to 255 each
    @param bgColor: tuple(BGR), values -->0 to 255 each
    @param pad_x: int(pixels)  padding of in x direction
    @param pad_y: int(pixels) 1 to 1.0 (), controls transparency of  text background
    @return: img(mat) with draw with background
    """
    (t_w, t_h), _= cv.getTextSize(text, font, fontScale, textThickness) # getting the text size
    x, y = textPos
    overlay = img.copy() # coping the image
    cv.rectangle(overlay, (x-pad_x, y+ pad_y), (x+t_w+pad_x, y-t_h-pad_y), bgColor,-1) # draw rectangle
    new_img = cv.addWeighted(overlay, bgOpacity, img, 1 - bgOpacity, 0) # overlaying the rectangle on the image.
    cv.putText(new_img,text, textPos,font, fontScale, textColor,textThickness ) # draw in text
    img = new_img

    return img

# landmark detection function
def landmarksDetection(img, results, draw=False):
    img_height, img_width= img.shape[:2]
    # list[(x,y), (x,y)....]
    mesh_coord = [(int(point.x * img_width), int(point.y * img_height)) for point in results.multi_face_landmarks[0].landmark]
    if draw :
        [cv.circle(img, p, 2, (0,255,0), -1) for p in mesh_coord]

    # returning the list of tuples for each landmarks
    return mesh_coord

# Euclaidean distance
def euclaideanDistance(point, point1):
    x, y = point
    x1, y1 = point1
    distance = math.sqrt((x1 - x)**2 + (y1 - y)**2)
    return distance

# Blinking Ratio
def blinkRatio(img, landmarks, right_indices, left_indices):
    # Right eyes
    # horizontal line
    rh_right = landmarks[right_indices[0]]
    rh_left = landmarks[right_indices[8]]
    # vertical line
    rv_top = landmarks[right_indices[12]]
    rv_bottom = landmarks[right_indices[4]]

    # LEFT_EYE
    # horizontal line
    lh_right = landmarks[left_indices[0]]
    lh_left = landmarks[left_indices[8]]

    # vertical line
    lv_top = landmarks[left_indices[12]]
    lv_bottom = landmarks[left_indices[4]]

    rhDistance = euclaideanDistance(rh_right, rh_left)
    rvDistance = euclaideanDistance(rv_top, rv_bottom)

    lvDistance = euclaideanDistance(lv_top, lv_bottom)
    lhDistance = euclaideanDistance(lh_right, lh_left)

    reRatio = rhDistance/rvDistance
    leRatio = lhDistance/lvDistance

    ratio = (reRatio+leRatio)/2
    return ratio


with map_face_mesh.FaceMesh(min_detection_confidence =0.5, min_tracking_confidence=0.5) as face_mesh:

    # starting time here
    start_time = time.time()
    # starting Video loop here.
    while True:
        frame_counter +=1 # frame counter
        ret, frame = camera.read() # getting frame from camera
        if not ret:
            break # no more frames break
        #  resizing frame

        frame = cv.resize(frame, None, fx=1.5, fy=1.5, interpolation=cv.INTER_CUBIC)
        frame_height, frame_width= frame.shape[:2]
        rgb_frame = cv.cvtColor(frame, cv.COLOR_RGB2BGR)
        results  = face_mesh.process(rgb_frame)
        if results.multi_face_landmarks:
            mesh_coords = landmarksDetection(frame, results, False)
            ratio = blinkRatio(frame, mesh_coords, RIGHT_EYE, LEFT_EYE)
            colorBackgroundText(frame,  f'Ratio : {round(ratio,2)}', FONTS, 0.7, (30,100),2, PINK, YELLOW)

            if ratio >3.6:
                CEF_COUNTER +=1
                colorBackgroundText(frame,  f'Blink', FONTS, 1.7, (int(frame_height/2), 100), 2, YELLOW, pad_x=6, pad_y=6, )
            else:
                if CEF_COUNTER>CLOSED_EYES_FRAME:
                    TOTAL_BLINKS +=1
                    CEF_COUNTER =0

            colorBackgroundText(frame,  f'Total Blinks: {TOTAL_BLINKS}', FONTS, 0.7, (30,150),2)

            cv.polylines(frame,  [np.array([mesh_coords[p] for p in LEFT_EYE ], dtype=np.int32)], True, GREEN, 1, cv.LINE_AA)
            cv.polylines(frame,  [np.array([mesh_coords[p] for p in RIGHT_EYE ], dtype=np.int32)], True, GREEN, 1, cv.LINE_AA)

        # calculating  frame per seconds FPS
        end_time = time.time()-start_time
        fps = frame_counter/end_time

        frame =textWithBackground(frame,f'FPS: {round(fps,1)}',FONTS, 1.0, (30, 50), bgOpacity=0.9, textThickness=2)
        # writing image for thumbnail drawing shape
        cv.imshow('Eye Blink Counter by www.edopedia.com', frame)
        key = cv.waitKey(2)
        if key==ord('q') or key ==ord('Q'):
            break
    cv.destroyAllWindows()
    camera.release()
If you have been searching for the right note-taking or knowledge management app, you have…
Looking for AnyType alternatives? You're not alone. AnyType has gained popularity as a privacy-focused, local-first…
Notion is a popular all-in-one workspace, but many users seek alternatives for different needs (free…
Logseq is a beloved tool in the personal knowledge management (PKM) community. It's free, open-source,…
Looking for a Webshare alternative? You're not alone. Webshare is a popular proxy service with…
Docker changed software development forever. It made containers accessible, gave developers a simple workflow, and…