In this tutorial, you will learn how to integrate the Stripe payment gateway with React, Node.js, Express app. We will use the react-stripe-checkout library to collect the payment from our users.
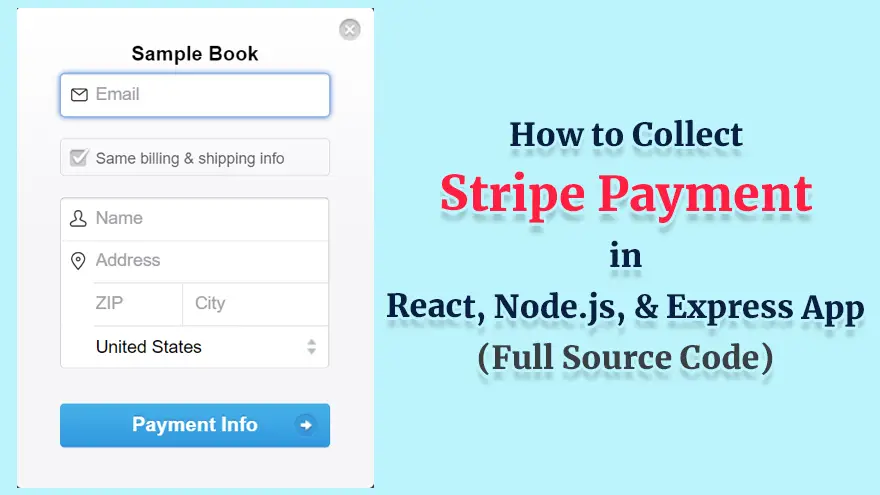
Here are some screenshots of the React Stripe Checkout app that you will be creating today.
Let’s get started by creating a new folder “client” to hold our React app.
mkdir client
cd client
Now create the sample React app in this folder.
npx create-react-app sampletestapp
At this point, we need to install some libraries that will help us build the React Stripe checkout functionality.
npm i axios
npm i react-stripe-checkout
npm i react-toastify
Now open the App.js file and copy/paste the following code into it.
Important Note: On line # 55, replace ##your_publishable_key## with the real publishable key that you got from your Stripe account dashboard.
import "./App.css";

import { useState } from "react";

import StripeCheckout from "react-stripe-checkout";

import axios from "axios";

import { toast } from "react-toastify";

import "react-toastify/dist/ReactToastify.css";

function App() {

  toast.configure()

  const [product] = useState({
    name: "Sample Book",
    price: 120,
    description: "This is a sample book",
  });

  async function handleToken(token, addresses) {
    const response = await axios.post(
      "http://localhost:8080/checkout",
      { token, product }
    );

    console.log(response.status)

    if (response.status === 200) {
      toast("Success! Check email for details", { type: "success" });
    } else {
      toast("Something went wrong", { type: "error" });
    }
  }

  return (
    <div className="App">
      <div className="container">
        <br />
        <br />
        <h1 className="text-center">Stripe Checkout</h1>
        <br />
        <h2 className="text-center">Product Info</h2>
        <h3 className="text-center">Product Name: {product.name}</h3>
        <h3 className="text-center">Product Price: {product.price}</h3>
        <h3 className="text-center">
          Product Description: {product.description}
        </h3>
        <br />
        <div className="form-group container">
          <StripeCheckout
            className="center"
            stripeKey="##your_publishable_key##"
            token={handleToken}
            amount={product.price * 100}
            name="Sample Book"
            billingAddress
            shippingAddress
          />
        </div>
      </div>
    </div>
  );
}

export default App;
Now we will make a backend for our React Stripe integration app. So, let’s create a new directory and name it “server” as shown below.
mkdir server
cd server
Now initialize the Node.js in it.
npm init -y
npm i express
npm i cors
npm i uuid
npm i stripe
Important Note: On line # 4, replace ##stripe_secret_key## with the actual Stripe secret key that you got from your Stripe account dashboard.
const cors = require("cors");
const express = require("express");
const bodyparser = require('body-parser')
const stripe = require("stripe")("##stripe_secret_key##");
const uuid = require("uuid").v4;

const app = express();

app.use(bodyparser.urlencoded({ extended: false }))
app.use(bodyparser.json())
app.use(cors())

app.get("/", (req, res) => {
  res.send("Add your Stripe Secret Key to the .require('stripe') statement!");
});

app.post("/checkout", async (req, res) => {
  console.log("Request:", req.body);

  let error;
  let status;
  try {
    const { product, token } = req.body;

    const customer = await stripe.customers.create({
      email: token.email,
      source: token.id,
    });

    const idempotency_key = uuid();
    const charge = await stripe.charges.create(
      {
        amount: product.price * 100,
        currency: "usd",
        customer: customer.id,
        receipt_email: token.email,
        description: `Purchased the ${product.name}`,
        shipping: {
          name: token.card.name,
          address: {
            line1: token.card.address_line1,
            line2: token.card.address_line2,
            city: token.card.address_city,
            country: token.card.address_country,
            postal_code: token.card.address_zip,
          },
        },
      },
      {
        idempotency_key,
      }
    );
    console.log("Charge:", { charge });
    status = "success";
  } catch (error) {
    console.error("Error:", error);
    status = "failure";
  }

  res.json({ error, status });
});

app.listen(8080);If you have been searching for the right note-taking or knowledge management app, you have…
Looking for AnyType alternatives? You're not alone. AnyType has gained popularity as a privacy-focused, local-first…
Notion is a popular all-in-one workspace, but many users seek alternatives for different needs (free…
Logseq is a beloved tool in the personal knowledge management (PKM) community. It's free, open-source,…
Looking for a Webshare alternative? You're not alone. Webshare is a popular proxy service with…
Docker changed software development forever. It made containers accessible, gave developers a simple workflow, and…

